Connect to WiFi
Materials
AMB82-mini x 1
Example
Introduction
There are 4 encryption types of WiFi connection in this guide.
“OPEN”, which means there is no password needed to connect to this network.
“WPA”, which requires the correct password to access.
“WEP”, which requires a hexadecimal password and a keyindex.
“WPA2-EAP”, which IA a Wi-Fi WPA2-EAP connection (also known as WPA2-Enterprise) is a secure wireless network authentication method typically used in organizations, universities, and enterprises. Instead of a shared password, it uses the Extensible Authentication Protocol (EAP) to authenticate users individually through a RADIUS server. Each user logs in with a unique username and password (or digital certificate), ensuring stronger security and better access control compared to personal WPA2 networks. TLS, PEAP, and TTLS are different EAP (Extensible Authentication Protocol) methods used in WPA2-Enterprise Wi-Fi connections to securely authenticate users.
EAP-TLS (Transport Layer Security): Uses digital certificates on both the server and client sides for mutual authentication. It’s highly secure but requires certificate management.
PEAP (Protected EAP): Creates a TLS-encrypted tunnel between the client and the authentication server, then sends user credentials (like username/password) inside the tunnel. Commonly used with MSCHAPv2 for password-based logins.
EAP-TTLS (Tunneled TLS): Similar to PEAP but more flexible. It also establishes a TLS tunnel, but allows various inner authentication methods (e.g., PAP, CHAP, MSCHAPv2) without requiring a client certificate.
In the following, we will give a brief introduction on how to establish WiFi connection with all above types of encryptions on Ameba.
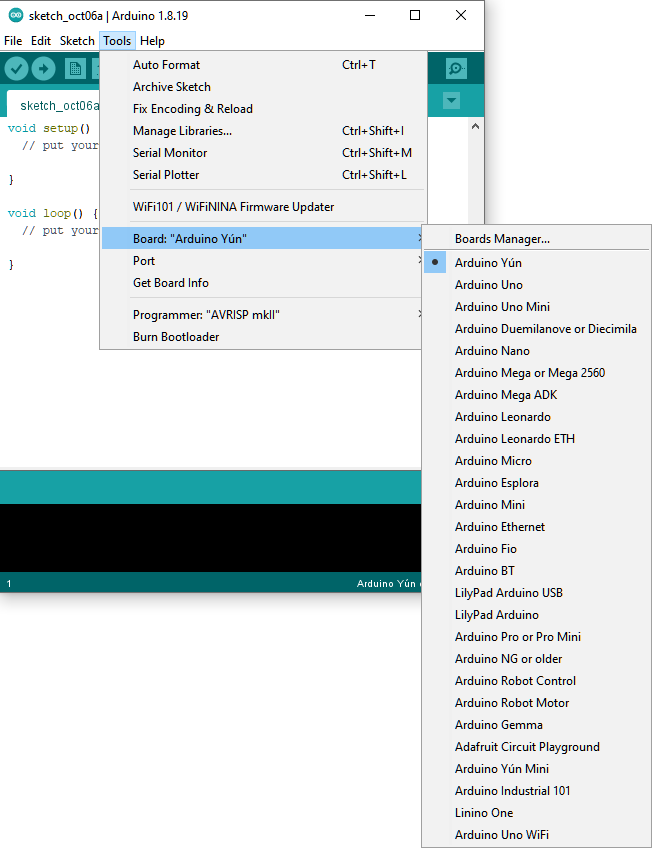
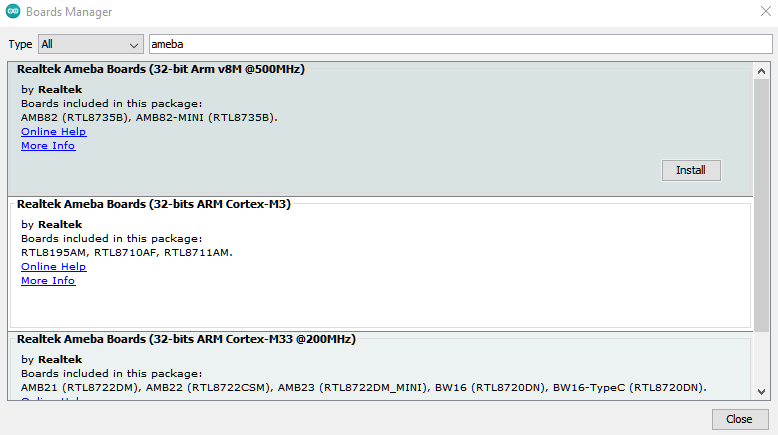
First, make sure the correct Ameba development board is selected in Tools -> Board
Open (WiFi connection without password)
Open example in File -> Examples -> WiFi -> ConnectToWiFi -> NoEncryption
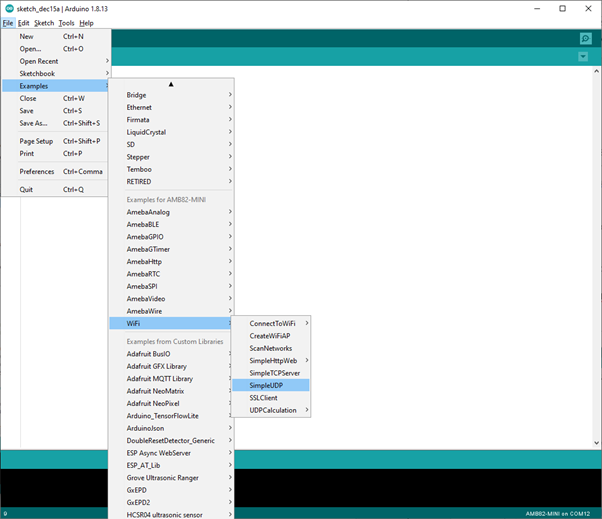
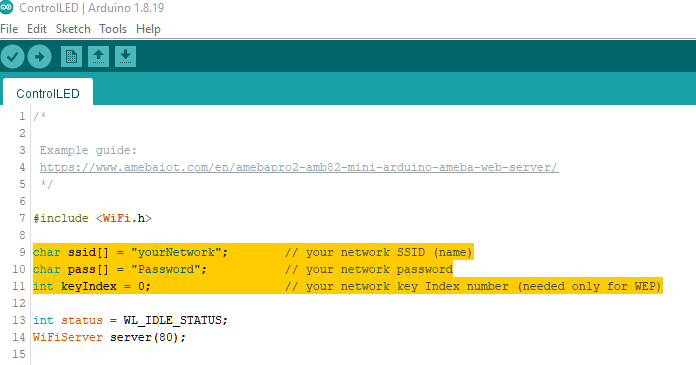
In the sample code, modify “ssid” to be the same as the WiFi SSID to be connected to.
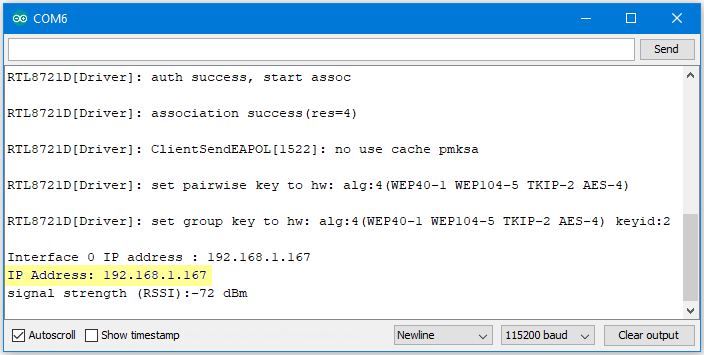
Next, upload the sample code, and press the reset button on Ameba. Then you will see a message “You’re connected to the networkSSID: XXXXX”, and the information of this WiFi connection is printed in the serial monitor every 10 seconds.
WiFi connection with WPA encryption
Open example in File -> Examples -> WiFi -> ConnectToWiFi -> WPA_Security
In the sample code, modify “ssid” to the WiFi SSID to be connected to and “pass” to the network password.
If you prefer to enter your SSID & password in the Serial monitor while
the program is running, uncomment #define MANUAL_INPUT at the top of the
file.
Next, upload the sample code, and press the reset button on Ameba. Then you will see a message “You’re connected to the networkSSID: XXXXX”, and the information of this WiFi connection is printed in the serial monitor every 10 seconds.
Note: If you enabled MANUAL_INPUT, after uploading the sample code and pressing the reset button on Ameba, input your SSID in the Serial monitor and press enter. Next, input your password, and press enter. Then you will see a message “You’re connected to the networkSSID: XXXXX”, and the information of this WiFi connection is printed in the serial monitor every 10 seconds.
WiFi connection with WEP encryption
Open example in File -> Examples -> WiFi -> ConnectToWiFi -> WEP_Security
In the sample code, modify “ssid” to the SSID to be connected, “key” to the hexadecimal password, “keyIndex” to your key index number.
If you prefer to enter your SSID & password in the Serial monitor while
the program is running, uncomment #define MANUAL_INPUT at the top of the
file.
Next, upload the sample code, and press the reset button on Ameba. Then you will see a message “You’re connected to the networkSSID: XXXXX”, and the information of this WiFi connection is printed in the IDE every 10 seconds.
Note: If you enabled MANUAL_INPUT, after uploading the sample code and pressing the reset button on Ameba, input your SSID in the Serial monitor and press enter. Next, input your key and press enter. Finally enter your password and press enter. Then you will see a message “You’re connected to the networkSSID: XXXXX”, and the information of this WiFi connection is printed in the serial monitor every 10 seconds.

WiFi connection with WPA2-Enterprise
This example requires setting up both the server and the Wi-Fi network for WPA2-EAP. Using the provided credentials with different EAP methods, the user can establish a WPA2-EAP connection by using Ameba.
Note
This example only demonstrates how to use credentials to connect to a WPA2-EAP network. It does not cover setting up the EAP server or configuring the network
Open example in File -> Examples -> WiFi -> ConnectToWiFi -> WPA2_Enterprise
In the sample code,
eap_methord: EAP connection methord “tls”, “peap”, “ttls”.
ssid: The network SSID (WiFi name).
identity: The network identity.
pass: The network password.
client_cert: Client certificate from EAP server.
client_key: Client key from EAP server.
ca_cert: CA certificate from EAP server.
Next, upload the sample code, and press the reset button on Ameba. Then you will see a message “Attempting to connect to WPA2 EAP SSID: XXXXX”, and the information of this WiFi connection.
Code Reference
Comparison with Arduino
#include to
use SPI to communicate with WiFi module.#include is not needed.