ILI9341 Bitmap Auto
Materials
AMB82-mini x 1
ILI9341 TFT LCD display x 1
Example
In this example, we will use the Ameba Pro2 board to display a BMP image on an ILI9341 TFT LCD through SPI communication. The BMP image will be automatically converted into a header file during compilation, without requiring users to manually convert the image.
Connect the ILI9341 TFT LCD display to the AMB82-mini board using the SPI interface.
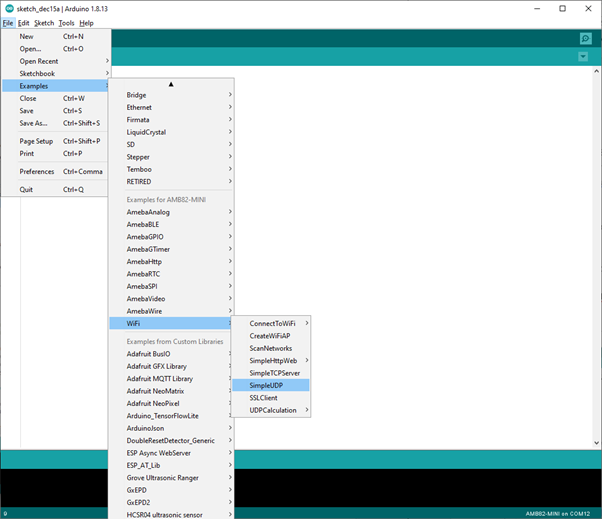
Open the sample code in File -> Examples -> AmebaSPI -> ILI9341_Bitmap_Auto.
Prepare a BMP image in 16-bit, 24-bit, or 32-bit format, with a maximum resolution of 240 x 320 pixels.
Place the BMP image in the same folder as the
ILI9341_Bitmap_Auto.ino sketch.
During compilation, the BMP image will be automatically
converted into a header file named auto_bitmap.h.
The converted image data will be included in the sketch.
The following code initializes the ILI9341 TFT LCD display and displays the converted bitmap image.
#if AUTO_BITMAP_PRESENT
    tft.drawBitmap(0, 0, AUTO_BITMAP_WIDTH,
                   AUTO_BITMAP_HEIGHT, auto_bitmap);
#endif
Compile and upload the code to Ameba, then press the reset button.
Open the Serial Monitor and set the baud rate to 115200. When the bitmap image is successfully displayed, the image filename and resolution will be printed in the Serial Monitor.
The converted BMP image will be displayed on the ILI9341 TFT LCD screen.
Additional
Users can replace the BMP image in the sketch folder with another supported image and recompile the sketch. The image will be automatically converted during the next build.
The SPI frequency is configured to 20 MHz by default, as shown below:
#define ILI9341_SPI_FREQUENCY 20000000
The TFT display control pins are defined as follows:
#define TFT_RESET 5
#define TFT_DC    4
#define TFT_CS    SPI_SS
Ensure that the ILI9341 TFT LCD is connected to the correct SPI and control pins.
If no valid BMP image is found, the example will display a message in the Serial Monitor indicating that no image was drawn.