E-Paper - Display Images
Materials
AmebaD [AMB21 / AMB22 / AMB23 / AMB25 / AMB26 / BW16 / AW-CU488 Thing Plus] x 1
Waveshare E-Paper [2.9inch E-Paper HAT (D)/ 2.9inch E-Paper V2/ 2.9inch e-Paper Module (B)/ 4.2inch e-Paper Module/ 4.2inch v2 e-Paper Module/ 7.5-inch E-Ink display HAT] x1
Example
In this example, AmebaD boards will be used to connect to a Waveshare e-Paper module (2.9inch/ 4.2inch/ 7.5inch) to display images. The display uses the flexible substrate as base plate, with an interface and a reference system design. You may refer to the official datasheet to know more information about these modules.
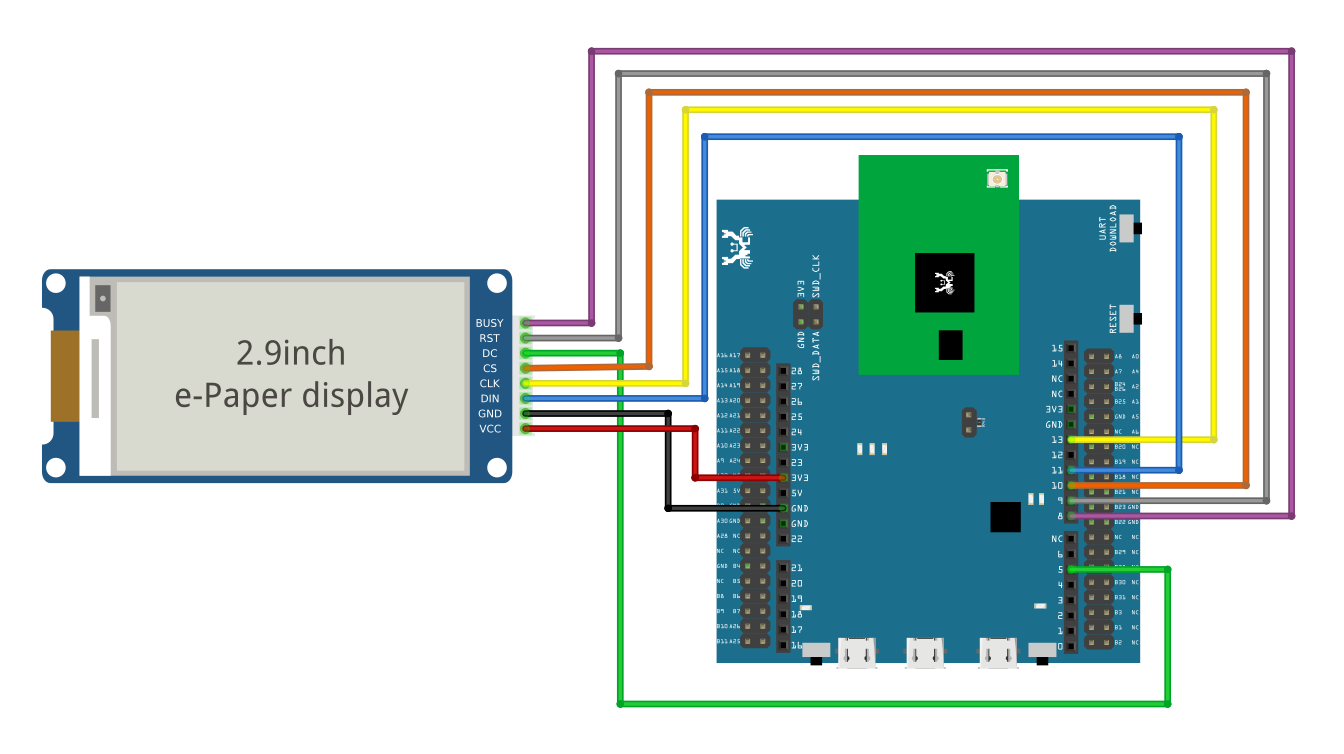
AMB21/22 wiring diagrams:
2.9inch HAT (D) e-Paper Module
2.9inch E-Paper V2 e-Paper Module/ 2.9inch e-Paper Module (B)
4.2inch e-Paper Module/ 4.2inch v2 e-Paper Module
7.5-inch e-Paper Module Do note that Display Config should be set to B and Interface Config should be set to 0.
Firstly, prepare a picture/photo and resize the image based on the e-Paper display that you are using. You can look for a photo resizing tool online, for example, the Online Image Resizer Simply follow the instructions on the website to resize the picture and download the resized image in JPEG format.
2.9” e-Paper module: 296x128 pixels
4.2” e-Paper module: 400x300 pixels
7.5” e-Paper module: 800x480 pixels
Secondly, use Image2LCD tool to convert the resized JPEG image into hexadecimal codes. You can visit this YouTube link to learn more about how to use the Image2LCD tool.
Download the Eink zip library, AmebaEink.zip Then install the AmebaEink.zip by navigating to Sketch -> Include Library -> Add .ZIP Library…
Eink examples are categorised based on the size and modules of the e-Paper display.
Open one of the “EinkDisplayImages” examples. For example, File -> Examples -> AmebaEink -> EPD_2in9v2 -> EinkDisplayImages
You may choose any GPIO pins for Busy, Reset and DC pin.
Upload the code to the board and press the reset button after uploading is done. Wait for around 1-2 seconds for the e-Paper module to refresh its screen. Images will start to loop on the e-Paper display, each image will be displaying for 4 seconds.
The 2.9-inch e-Paper Module (B) supports three colours—red, black, and white. You may refer to the example for 2.9-inch e-Paper Module (B) to learn how to display red images by navigating to File -> Examples -> AmebaEink -> EPD_2in9b -> EinkDisplayImages
Red image displaying on 2.9-inch Module (B) e-Paper display is shown below.
Code Reference
[1] We use Good Display GDEH029A1 2.9 Inch / 296x128 Resolution / Partial Refresh Arduino Sample Code to get the e-Paper successfully Display: http://www.good-display.com/product/201.html
[2] EPD libraries can be obtained from: https://github.com/waveshare/e-Paper
[3] Generate a QR code on the E-paper module: https://eugeniopace.org/qrcode/arduino/eink/2019/07/01/qrcode-on-arduino.html


